Monday, February 16, 2015

MapReduce Program using Eclipse and Hadoop 2.6.0

Pre-reqisite:

- Single node Hadoop should be up and runing

Please follow my previous blog on single node Hadoop setup if it not ready for you

Hadoop Single Node Setup

- Down load and install Eclipse from below location if Eclipse does not exist

wget http://www.eclipse.org/downloads/download.php?file=/technology/epp/downloads/release/kepler/SR2/eclipse-jee-kepler-SR2-linux-gtk-x86_64.tar.gz

bhupendra@ubuntu:/home/hduser/eclipse$ ./eclipse
Step 1:
Start Eclipse and create New Java  Project as below


Step 2: Write Wordcount Driver class


Step 3: Replace below code from autogenerated WordCount.java class

import org.apache.hadoop.conf.Configuration;
import org.apache.hadoop.conf.Configured;
import org.apache.hadoop.fs.Path;
import org.apache.hadoop.io.IntWritable;
import org.apache.hadoop.io.Text;
import org.apache.hadoop.mapred.FileInputFormat;
import org.apache.hadoop.mapred.FileOutputFormat;
import org.apache.hadoop.mapred.JobClient;
import org.apache.hadoop.mapred.JobConf;
import org.apache.hadoop.util.Tool;
import org.apache.hadoop.util.ToolRunner;


public class WordCount extends Configured implements Tool{
      public int run(String[] args) throws Exception
      {
            //creating a JobConf object and assigning a job name for identification purposes
            JobConf conf = new JobConf(getConf(), WordCount.class);
            conf.setJobName("WordCount");

            //Setting configuration object with the Data Type of output Key and Value
            conf.setOutputKeyClass(Text.class);
            conf.setOutputValueClass(IntWritable.class);

            //Providing the mapper and reducer class names
            conf.setMapperClass(WordCountMapper.class);
            conf.setReducerClass(WordCountReducer.class);
            //conf.setMapperClass(WordCountMapper.class);
            //conf.setMapperClass(WordCountReducer.class);
            //We wil give 2 arguments at the run time, one in input path and other is output path
            Path inp = new Path(args[0]);
            Path out = new Path(args[1]);
            //the hdfs input and output directory to be fetched from the command line
            FileInputFormat.addInputPath(conf, inp);
            FileOutputFormat.setOutputPath(conf, out);

            JobClient.runJob(conf);
            return 0;
      }
   
      public static void main(String[] args) throws Exception
      {
            // this main function will call run method defined above.
        int res = ToolRunner.run(new Configuration(), new WordCount(),args);
            System.exit(res);
      }
}


Step 4: Create new WordCountMapper class

Replace with below codes

import java.io.IOException;
import java.util.StringTokenizer;

import org.apache.hadoop.io.*;
import org.apache.hadoop.mapred.*;

public class WordCountMapper extends MapReduceBase implements Mapper<LongWritable, Text, Text, IntWritable>
{
      //hadoop supported data types
      private final static IntWritable one = new IntWritable(1);
      private Text word = new Text();
   
      //map method that performs the tokenizer job and framing the initial key value pairs
      // after all lines are converted into key-value pairs, reducer is called.
      public void map(LongWritable key, Text value, OutputCollector<Text, IntWritable> output, Reporter reporter) throws IOException
      {
            //taking one line at a time from input file and tokenizing the same
            String line = value.toString();
            StringTokenizer tokenizer = new StringTokenizer(line);
       
          //iterating through all the words available in that line and forming the key value pair
            while (tokenizer.hasMoreTokens())
            {
               word.set(tokenizer.nextToken());
               //sending to output collector which inturn passes the same to reducer
                 output.collect(word, one);
            }
       }
}


Step 5: Create WordCountReducer Class
And replace with below code

import java.io.IOException;
import java.util.Iterator;

import org.apache.hadoop.io.*;
import org.apache.hadoop.mapred.*;

public class WordCountReducer extends MapReduceBase implements Reducer<Text, IntWritable, Text, IntWritable>
{
      //reduce method accepts the Key Value pairs from mappers, do the aggregation based on keys and produce the final out put
      public void reduce(Text key, Iterator<IntWritable> values, OutputCollector<Text, IntWritable> output, Reporter reporter) throws IOException
      {
            int sum = 0;
            /*iterates through all the values available with a key and add them together and give the
            final result as the key and sum of its values*/
          while (values.hasNext())
          {
               sum += values.next().get();
          }
          output.collect(key, new IntWritable(sum));
      }
}

Step 6: If Above java classes are not having any syntax error, the corresponding class file will be generated automatically as follows:


Step 7:
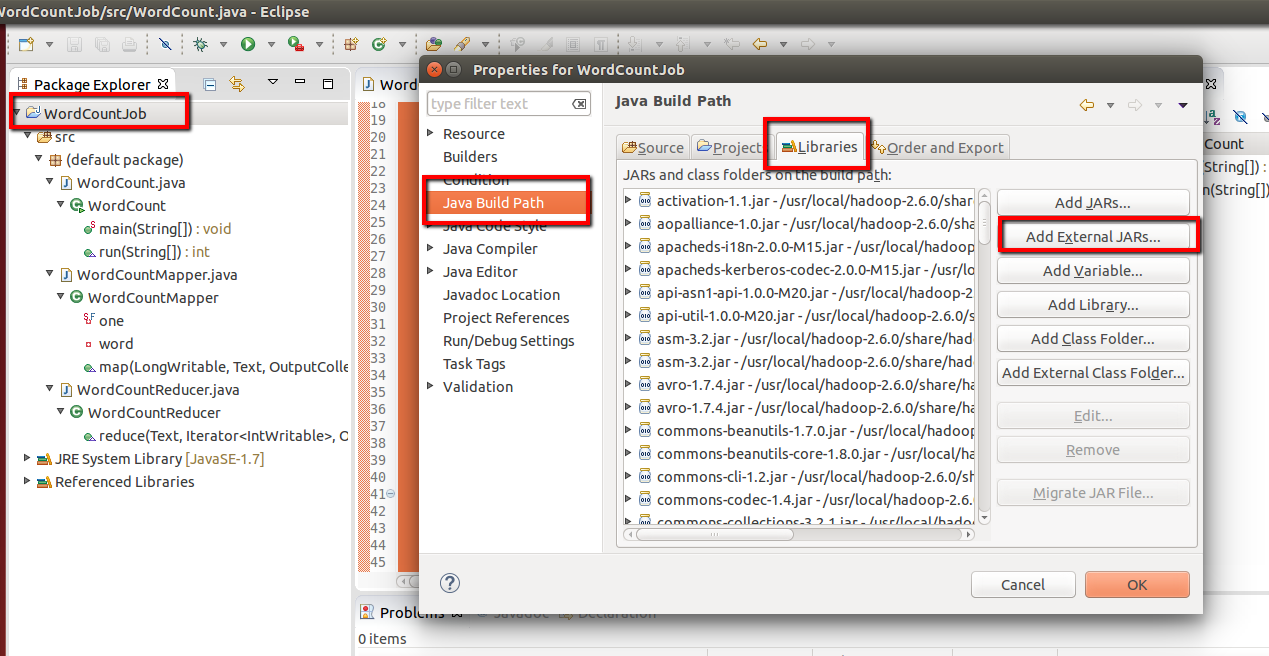
Additionally before step 6,  we have to add dependencies by  adding external libraries from hadoop
Follow the below screenshots and added external jar from path
( in my case its /usr/local/hadoop-2.6.0/share/hadoop/common and /usr/local/hadoop-2.6.0/share/hadoop/mapreduce )

{HADOOP_HOME}/share/hadoop/common
{HADOOP_HOME}/share/hadoop/common/lib
{HADOOP_HOME}/share/hadoop/mapreduce
{HADOOP_HOME}/share/hadoop/yarn
{HADOOP_HOME}/share/hadoop/hdfs


Step 8:
Now Click on the Run tab and click Run-Configurations. Click on New Configuration button and fill the Name, Project Name and Main Class per screen-shots


Step 9:
Now right click on project and  select Export. under Java, select Runnable Jar.
In Launch Config - select the config fie you created in Step 8  (WordCountConfig).
Select an export destination ( lets say desktop.)
Under Library handling, select Extract Required Libraries into generated JAR and click Finish.


Step 10:

- Switch to hduser $sudo su hduser

- Remove temp file generated to gracefully start all required hadoop deamons like namenode, datanode, resourcemange, applicaiton manager, 2ndory Name node.


temp file location is based on tmp file location defined in one of the hadoop configuration file core-site.xml

Step 11: Format name node using below command

#hadoop namenode -format and output will be something like below

Step 12: start process and check if required deamon has been started gracefully or not. Refer below screen and commands for the same

Please note, if temp files are there and not removed, few of deamons will not be started properly. 

Step 13:
Make a hdfs directory ( Note: These directories are not listed when ls is used in the terminal and they are also not visible in the File Browser ) -  hadoop dfs -mkdir -p /usr/local/hadoop-2.6.0/input
Copy the sample input text file into this hdfs directory -   hadoop dfs -copyFromLocal /home/bhupendra/workspace/sample1.txt /usr/local/hadoop-.2.6.0/input
Change directory to run an example Wordcount program using jar file. NOTE: Don't create output folder out1, it  will be created and every time you run an example, give a new directory. These directories are not visible with ls command in terminal.
hadoop jar wordcount.jar /usr/local/hadoop/input /usr/local/hadoop/output

<< I will fix the above issue latter, as this issue causing unable to run hadoop command to create directory and copyfile from local to hdfs director"input"
to run the programme, I have created input directory using usula mkdir command and copied file using cp command >>

Error:
hadoop fs -ls
15/01/30 17:03:49 WARN util.NativeCodeLoader: Unable to load native-hadoop 
ibrary for your platform... using builtin-java classes where applicable
ls: `.': No such file or directory
Fix1
well, your problem regarding ls: '.': No such file or directory' is because there is not home dir on HDFS for your current user. Try
hadoop fs -mkdir -p /user/[current login user]
Then you will be able to hadoop fs -ls
Fix2
go to hadoop conf path
hduser@ubuntu:/usr/local/hadoop-2.6.0/etc/hadoop
vi hadoop-en.sh and add following lines

export HADOOP_PREFIX=/usr/local/hadoop-2.6.0
export HADOOP_HOME=/usr/local/hadoop-2.6.0
export PATH=$PATH:$HADOOP_HOME/bin
export HADOOP_MAPRED_HOME=${HADOOP_HOME}
export HADOOP_COMMON_HOME=${HADOOP_HOME}
export HADOOP_HDFS_HOME=${HADOOP_HOME}
export YARN_HOME=${HADOOP_HOME}
export HADOOP_CONF_DIR=${HADOOP_HOME}/etc/hadoop

< Please note hadoop-env.sh environment variable overrides variables in side .bashrc file. Hence it is mandatory to add above lines in hadoop-env.sh file>

Step 14:
run the job using below command 
hadoop jar WordCount.jar /usr/local/hadoop-2.6.0/input /usr/local/hadoop-2.6.0/output


Step 15
Browse the Hadoop GUI

http://localhost:50070/dfshealth.html#tab-overview

Step 16:
Browse the output file 
http://localhost:50070/explorer.html#/usr/local/hadoop-2.6.0/output

Step 17:
Stop all deamons if you are done with job
http://localhost:8088/cluster

hduser@ubuntu:/usr/local/hadoop-2.6.0/etc/hadoop$ hadoop fs -ls hdfs://localhost:54310
Found 1 items
drwxr-xr-x   - hduser supergroup          0 2015-07-17 10:42 hdfs://localhost:54310/user/hduser/input
hduser@ubuntu:/usr/local/hadoop-2.6.0/etc/hadoop$ 

Hadoop Single Node Setup

System requirement:


1. mkdir /usr/local/hadoop-2.6.0

2. cd /usr/local/hadoop-2.6.0

3. wget http://mirror.metrocast.net/apache/hadoop/common/hadoop-2.6.0/hadoop-2.6.0.tar.gz

4. tar -xzfv hadoop-2.6.0.tar.gz

5. add new user
 
     $ usergroup hadoop
     $ useradd -g hadoop hduser
 to change primary group
usermod -g primarygrpname username
to change secondary group
usermod -G secondarygrpname username

6. Install ssh-server
  $ apt-get install openssh-server

7. generate ssh key
$ su - hduser
$ ssh-key gen
$ cat $HOME/.ssh/id_rsa.pub >> $HOME/.ssh/authorized_keys
$ ssh hduser@localhost


  • Disabling IPv6
  • Open config file: sudo gedit /etc/sysctl.conf
  • Add these 3 lines at the end of the file: 
  • #disable ipv6; net.ipv6.conf.all.disable_ipv6 = 1 net.ipv6.conf.default.disable_ipv6 = 1 net.ipv6.conf.lo.disable_ipv6 = 1
    • after adding the following code, reload the settings  using-  source  ~/.bashrc  and   source  ~/.profile

    • Configuring hadoop Configuration file
            Change directory using cd /usr/local/hadoop/etc/hadoop
       
        $ vi yarn-site.xml
         
    <configuration>
    <property>
    <name>dfs.replication</name>
    <value>1</value>
    <description>Default block replication.
    The actual number of replications can be specified when the file is created.
    The default is used if replication is not specified in create time.
    </description>
    </property>
    </configuration
    • Create direcotry as below
    • Format file system 
    • cd /usr/local/hadoop-2.6.0
    • ./hadoop namenode -format

    • Go to sbin and start all demons
    • cd  /usr/local/hadoop-2.6.0/sbin
    • $ ./start-all.sh
    • to check if all demons are running
    • $jps

    If any daemon doesn't start, start them manually
        hadoop-daemon.sh start namenode
        hadoop-daemon.sh start datanode
        yarn-daemon.sh start resourcemanager
        yarn-daemon.sh start nodemanager
        mr-jobhistory-daemon.sh start historyserver

        Hadoop Web Interfaces.
            Namenode - http://localhost:50070/
            Secondary Namenode - http://localhost:50090
            Most important is jps. Use jps to check which daemons are running.


    $chown -R hduser:hadoop /usr/local/hadoop-2.6.0
    $chmod +x -R /usr/local/hadoop-2.6.0
    Setting Global Variable
    $ vi /home/hduser/.bashrc
    export HADOOP_PREFIX=/usr/local/hadoop-2.6.0
    export HADOOP_HOME=/usr/local/hadoop-2.6.0
    export HADOOP_MAPRED_HOME=${HADOOP_HOME}
    export HADOOP_COMMON_HOME=${HADOOP_HOME}
    export HADOOP_HDFS_HOME=${HADOOP_HOME}
    export YARN_HOME=${HADOOP_HOME}
    export HADOOP_CONF_DIR=${HADOOP_HOME}/etc/hadoop
    # Native Path
    export HADOOP_COMMON_LIB_NATIVE_DIR=${HADOOP_PREFIX}/lib/native
    export HADOOP_OPTS="-Djava.library.path=$HADOOP_PREFIX/lib"
    #Java path
    export JAVA_HOME='/usr/lib/jvm/java-7-oracle'
    # Add Hadoop bin/ directory to PATH

    export PATH=$PATH:$HADOOP_HOME/bin:$JAVA_PATH/bin:$HADOOP_HOME/sbin

    $vi /home/hduser/.profile
    export HADOOP_PREFIX=/usr/local/hadoop-2.6.0
    export HADOOP_HOME=/usr/local/hadoop-2.6.0
    export HADOOP_MAPRED_HOME=${HADOOP_HOME}
    export HADOOP_COMMON_HOME=${HADOOP_HOME}
    export HADOOP_HDFS_HOME=${HADOOP_HOME}
    export YARN_HOME=${HADOOP_HOME}
    export HADOOP_CONF_DIR=${HADOOP_HOME}/etc/hadoop
    # Native Path
    export HADOOP_COMMON_LIB_NATIVE_DIR=${HADOOP_PREFIX}/lib/native
    export HADOOP_OPTS="-Djava.library.path=$HADOOP_PREFIX/lib"
    #Java path
    export JAVA_HOME='/usr/lib/jvm/java-7-oracle'
    # Add Hadoop bin/ directory to PATH

    export PATH=$PATH:$HADOOP_HOME/bin:$JAVA_PATH/bin:$HADOOP_HOME/sbin

    $/usr/local/hadoop-2.6.0/etc/hadoop/hadoop-env.sh
    export JAVA_HOME=/usr/lib/jvm/java-7-oracle


         <configuration>
    <!-- Site specific YARN configuration properties -->
    <property>
    <name>yarn.nodemanager.aux-services</name>
    <value>mapreduce_shuffle</value>
    </property>
    <property>
    <name>yarn.nodemanager.aux-services.mapreduce.shuffle.class</name>
    <value>org.apache.hadoop.mapred.ShuffleHandler</value>
    </property>
    </configuration>

    $vi core-site.xml
    <configuration>
    <property>
      <name>hadoop.tmp.dir</name>
      <value>/usr/local/hadoop-2.6.0/tmp</value>
      <description>A base for other temporary directories.</description>
    </property>

    <property>
      <name>fs.default.name</name>
      <value>hdfs://localhost:54310</value>
      <description>The name of the default file system.  A URI whose
      scheme and authority determine the FileSystem implementation.  The
      uri's scheme determines the config property (fs.SCHEME.impl) naming
      the FileSystem implementation class.  The uri's authority is used to
      determine the host, port, etc. for a filesystem.</description>
    </property>

    </configuration>

    $  vi mapred-site.xml
    <configuration>
    <property>
      <name>mapred.job.tracker</name>
      <value>localhost:54311</value>
      <description>The host and port that the MapReduce job tracker runs
      at.  If "local", then jobs are run in-process as a single map
      and reduce task.
      </description>
    </property>

    </configuration>

    $ vi hdfs-site.xml
    mkdir -p $HADOOP_HOME/yarn_data/hdfs/datenode
    mkdir -p $HADOOP_HOME/yarn_data/hdfs/namenode

    Offline Image Viewer Guide

    -rw-r--r-- 1 hduser hadoop  100722 Oct  7 20:49 fsimage_0000000000000008804
    -rw-r--r-- 1 hduser hadoop      62 Oct  7 20:49 fsimage_0000000000000008804.md5
    drwxrwxr-x 3 hduser hduser    4096 Oct  8 22:49 ..
    -rw-r--r-- 1 hduser hadoop  100722 Oct  8 22:49 fsimage_0000000000000008805
    -rw-r--r-- 1 hduser hadoop      62 Oct  8 22:49 fsimage_0000000000000008805.md5
    -rw-rw-r-- 1 hduser hduser     202 Oct  8 22:49 VERSION
    -rw-r--r-- 1 hduser hadoop       5 Oct  8 22:49 seen_txid
    -rw-r--r-- 1 hduser hadoop 1048576 Oct  8 22:49 edits_inprogress_0000000000000008806
    drwxrwxr-x 2 hduser hduser   12288 Oct  8 22:49 .
    hduser@ubuntu:/usr/local/hadoop-2.6.0/tmp/dfs/name/current$ cat fsimage_0000000000000008805.md5
    929bde84fb1432baba3228dc78b3b6d8 *fsimage_0000000000000008805
    hduser@ubuntu:/usr/local/hadoop-2.6.0/tmp/dfs/name/current$ hdfs oiv -i fsimage_0000000000000008805
    15/10/08 23:02:31 INFO offlineImageViewer.FSImageHandler: Loading 2 strings
    15/10/08 23:02:31 INFO offlineImageViewer.FSImageHandler: Loading 1273 inodes.
    15/10/08 23:02:31 INFO offlineImageViewer.FSImageHandler: Loading inode references
    15/10/08 23:02:31 INFO offlineImageViewer.FSImageHandler: Loaded 0 inode references
    15/10/08 23:02:31 INFO offlineImageViewer.FSImageHandler: Loading inode directory section
    15/10/08 23:02:31 INFO offlineImageViewer.FSImageHandler: Loaded 164 directories
    15/10/08 23:02:31 INFO offlineImageViewer.WebImageViewer: WebImageViewer started. Listening on /127.0.0.1:5978. Press Ctrl+C to stop the viewer.
    15/10/08 23:04:27 INFO offlineImageViewer.FSImageHandler: 200 method=GET op=GETFILESTATUS target=/user/hduser
    15/10/08 23:04:27 INFO offlineImageViewer.FSImageHandler: 200 method=GET op=LISTSTATUS target=/user/hduser
    15/10/08 23:04:51 INFO offlineImageViewer.FSImageHandler: 200 method=GET op=GETFILESTATUS target=/user/hduser
    15/10/08 23:04:51 INFO offlineImageViewer.FSImageHandler: 200 method=GET op=LISTSTATUS target=/user/hduser
    15/10/08 23:05:41 INFO offlineImageViewer.FSImageHandler: 200 method=GET op=GETFILESTATUS target=/user/hduser
    15/10/08 23:05:42 INFO offlineImageViewer.FSImageHandler: 200 method=GET op=LISTSTATUS target=/user/hduser
    15/10/08 23:05:42 INFO offlineImageViewer.FSImageHandler: 200 method=GET op=LISTSTATUS target=/user/hduser/input
    15/10/08 23:05:42 INFO offlineImageViewer.FSImageHandler: 200 method=GET op=LISTSTATUS target=/user/hduser/input1
    15/10/08 23:05:42 INFO offlineImageViewer.FSImageHandler: 200 method=GET op=LISTSTATUS target=/user/hduser/input2
    15/10/08 23:05:42 INFO offlineImageViewer.FSImageHandler: 200 method=GET op=LISTSTATUS target=/user/hduser/input3
    15/10/08 23:06:47 INFO offlineImageViewer.FSImageHandler: 200 method=GET op=LISTSTATUS target=/


    Sunday, December 21, 2014

    Machine Learning

    It was great call on  Machine Learning with Ruby  which happened in meetup at Thoughtworks

    Let me share few highlights on the same..

    It was interesting session we talked about how machine learning actually playing great role in business

    What machine learning is

    Machine learning can be considered a sub field of computer science and statistics. It has strong ties to artificial intelligence and optimization, which deliver methods, theory and application domains to the field. Machine learning is employed in a range of computing tasks where designing and programming explicit, rule-based algorithms is unfeasible. Example applications include spam filtering, optical character recognition (OCR),[3] search engines and computer vision. Machine learning is sometimes conflated with data mining,[4] although that focuses more on exploratory data analysis.[5] Machine learning and pattern recognition "can be viewed as two

    Interested article published based on Machine Learning


    We have couple of product already working on same direction

    Popular open source framework Mahout
    Product from IBM WatSon 

    Finally we practiced same using Ruby. You can find code base at following github URL

    https://github.com/tuxdna/rubyml


    Sunday, August 19, 2012

    Installing Windows Server 2008 EE with Ruby on Rails and LDAP (Part Four)


    Installing Windows Server 2008 EE with Ruby on Rails and LDAP (Part Four)

    So, we've made a lot of headway through the last three parts.  But, we haven't really checked to ensure that Apache (our load balancer) is working.  In addition, we need to configure it to accept proxying to THIN so that our fast HTTP server is working together with it.  Let's do that now.

    If you notice on our server, apache is already running as a default service.  All we need to do is check and see if it's running by opening a browser and pointing the URL to http://localhost/.  Notice that we're not pointing anything to a specific port, nor are we running our rails application here.  


    As you can see here, it says that "It works!".  So, apache is working fine.  Let's look at how we are going to configure it to work with Thin.

    If you drive down into the following directory:

    C:\Program Files (x86)\Apache Software Foundation\Apache2.2\conf

    In this directory, you'll find httpd.conf which in windows looks like a text file.  If you open this, you'll find all of the apache configurations for your local server.  Before you dive into this, there are a few ways we could go about setting this up.  If your server is going to be using apache and has a lot of virtualization, you could include this file and make your changes specific to this vm in httpd-vhost.conf, or similar.  But, since we're trying to make this as simple as possible, we'll make our changes in here.

    We need to first uncomment the following two lines:

    LoadModule proxy_module modules/mod_proxy.so
    LoadModule proxy_http_module modules/mod_proxy_http.so

    We'll be using these two modules to proxy requests coming into apache and force them to go to Thin.  In addition, we'll need to add some information to our virtualhost.  Here's the additional information we'll be adding to httpd.conf at the very bottom of the file:

    <VirtualHost localhost:80>
          ServerName ror-devapp01
          DocumentRoot "C:/web/ldap/public"
          ProxyPass / http://localhost:3000/
          ProxyPassReverse / http://localhost:3000/
          ProxyPreserveHost On
    </VirtualHost>

    <VirtualHost ror-devapp01>
          ServerName ror-devapp01
          DocumentRoot "C:/web/ldap/public"
          ProxyPass / http://localhost:3000/
          ProxyPassReverse / http://localhost:3000/
          ProxyPreserveHost On
    </VirtualHost>

    So, let's look over the information above and determine why it's being set this way.  The ServerName is normally the live address of the server.  The documentroot is the location of the rails public directory in our rails application.  If you open a web browser and go tohttp://localhost or http://ror-devapp01 (the latter remember, is the name of my server), you'll see it is just pointing to "It works!".  What this says is that apache doesn't know how to handle incoming requests and send them over to Thin.  By adding the virtualhost for localhost, we are saying to pass this proxy over to localhost:3000 which happens to be the address and port of our Thin server.  In addition, we also have to add a virtual entry for our server name because otherwise the http://ror-devapp01 would also fail to pass over to Thin.  By adding both of these entries we accomplish this.

    However, we still need to two more things after saving this modified httpd.conf file.  We need to start our Thin server by going into our root rails application and typing "rails s thin", and we also need to restart the apache server, which can be accomplished either by restarting it from the apache tool in your system tray, or going to services and restarting the apache service.  We need to restart apache services because we made changes to the httpd.conf file.

    Let's open a web browser and test both URLs now:

    http://localhost
    http://ror-devapp01 (or the name of your current server)

    Look at that, they pass right over to the Rails Thin server!

    With this new information in place, apache can now handle incoming requests to localhost and to our server directly, passing them over to the Rails Thin server which acts as our fast HTTP server for this application.  Now that we have this part done, we can come back to apache later on for further configurations and modifications.  As a quick review, we have everything setup to start working with our base application.  Apache has been initially configured, Ruby and RoR is up and running, we have a good understanding of how all of the configuration is working together.  The only thing we haven't decided on is what type of application we will be creating.

    Before we jump into some programming in our new environment, it is going to be appropriate to decide how we want to work with our application as far as an editor.  I could make this very simplistic and go with a simple text editor, but I like a fully functioning IDE as my preference, and Netbeans works wonderfully on Windows. Why not take advantage of that?

    We can find the latest netbeans here:

    http://www.oracle.com/technetwork/java/javase/downloads/jdk-netbeans-jsp-142931.html

    I'm downloading Netbeans 6.9.1 with JDK 6.24.

    Before we go and get it, we'll also need to make sure we install the latest JDK library as well.  The good news is that netbeans comes with a bundled install that houses JDK, and we can just grab the bundled version and begin our installation.

    After installing it, and launching it, Netbeans takes you to a generic home page.  The first thing I want to do is set my netbeans up so it looks a little friendlier.  

    If you go to Tools --> Plugins and go to the available plugins tab, you can type the word Rubyin the search box and you will find two plugins that are essential for ruby development.  These are Extra Color Themes and Ruby and Rails.


    Place a checkmark in both boxes, click install, accept the license agreement, and install the plugins. Once finished, restart Netbeans.

    Now that we have our plugins installed, let's perform some configurations for our programming environment.

    Go to Tools --> Options, and select Fonts and Colors.  Change the profile to "Aloha" and click OK.  This will make our programming code look very similar to textmate.


    Now that we have our fonts and colors setup, let's configure our Ruby platform and open our default ldap project.

    Go to File --> New Project, and select Ruby, and then select Ruby on Rails Application with Existing Sources.  Click Next.


    On the next screen, change your project folder to C:\Web\ldap and name your project LDAP.  Click the drop down next to Ruby Platform and choose the Ruby 1.9.2-p180 platform (or your existing ruby platform).  Leave the server set to webrick.


    Don't worry about the Server type.  We're not going to use Netbeans to start our server.  We're just going to use it for everything else.  Go ahead and click finish and once completed, you should see your rails LDAP project now.  Just for fun, go ahead and open up the Gemfile and everything should look similar to the screenshot below:


    Terrific!  So, I would go ahead and browse around the interface and get familiar with the directory structure of our new application.  We've accomplished quite a bit today and we're ready to start working on some further configurations within rails, and adding some more important gems to our project.

    Again, we haven't really started coding yet so you can see how extensive it can be sometimes with just trying to get your project started.  However, as you have a fully functioning environment setup, you won't have to take quite as much time to setup the next app.

    See you again in part five.

    Monday, April 4, 2011

    Installing Windows Server 2008 EE with Ruby on Rails and LDAP (Part Three)


    Installing Windows Server 2008 EE with Ruby on Rails and LDAP (Part Three)

    In Part Two, we successfully installed Apache and Ruby.  In this part, we’re going to focus on Rails, some gem dependencies for our application, and decide on our database and web server in rails.  Once done, I’m going to try to work on some additional configuration for our server. So, with that said, let’s start with installing Rails.  

    First, there are two choices we can make here.  We can install the latest version of Rails, or install the latest version of EDGE rails; the latter being the cutting edge of rails development. Because my goal here is working with LDAP authentication and functionality, I’m going to stick with the very basics.  Let’s start.

    => gem install rails


    As you can see, rails installed a lot of core dependencies here.  Now, I want to make things simple in terms of where my app is going to launch.  So, I’ll create a directory called Web in the root of C:\ and place my new application in there.

    C:\>md web
    C:\Web>rails new ldap


    Good.  I now have a new application for rails called ldap located in C:\Web\ldap.

    I’m also going to have to install the DevKit properly in case any gems need to be built on Windows Server 2008.  I already have the development kit downloaded, so I’m going to extract it into a directory called:

    C:\DevKit>

    Once extracted, I need to go to that directory and type the following commands:

    => ruby dk.rb init
    => ruby dk.rb install

    The init command creates a .yml (YAML) file that houses the directories on the server where ruby is installed.  By default it knows that Ruby192 was already listed in C:\ and so no modification was necessary.  Once I ran the install, it created some enhancements in the existing ruby directory for C:\Ruby192.

    If you need to see more instructions about the DevKit, you can go here:


    The Database

    Rails already comes with a default database called SQLite3.  Because this is a simple test application, I’m going to keep this default.  However, Windows Server 2008 doesn’t know what this is.  You still need to download the .dll library.  You can find it here:


    I only need the .dll so I’ll install that in downloads and then extract and move the .dll into my C:\Ruby192\bin directory.  This directory is already added to my system path, so it’ll find it just fine.

    I’ll modify the gem file and take a peek and for now, everything is exactly what I need. There’s nothing I need to do here until later.  Let’s go ahead and test whether or not we have a basic functioning rails app.

    C:\Web\ldap\>bundle install
    C:\Web\ldap\>rails s

    Bundling will make sure any gems, and dependencies I need are installed and once complete,rails s will start the server.  Once the server starts (using a generic webrick server), let’s go to http://localhost:3000 (in my case) and take a look:


    Great!  It’s working.  We’re riding Ruby on Rails on Windows Server 2008.  No time to pat myself on the back yet, I still have quite a few things left to do here.  Let’s get to work!

    I want to get thin installed, but unfortunately on Windows, thin (which requires rack and eventmachine) can be a pain in the butt to install.  However, there’s a great work around we can do on Windows to get this installed and it partly uses “Git” to accomplish this task.   I’ll eventually be using Git anyways later on to backup my source code, so I’ll just go grab a copy of it from here:


    When I install it, I want to include the git bash here and git gui here context menu entries and also make sure you choose “as is” on the following screen so you don’t get the CRLF issues when pushing your source files later on.


    Now then, I have Git successfully installed, but before I do anything I’ll need another gem called specific_install.  From a windows command prompt type the following:

    => gem install specific_install

    Now that I have this gem installed, I’ll right-click anywhere on a directory in windows explorer (and choose git bash here).

    Run gitbash and type:

    => gem specific_install -l git://github.com/eventmachine/eventmachine.git

    This should install the latest beta or latest eventmachine file, which is required by Thin to operate.  Rack already came with the latest version of rails, so nothing is needed here.  You might be saying whoa!! Why aren’t you just using the Developer Kit and compiling eventmachine.  Well, on windows server 2008 64-bit, that’s not going to work.  I will get a compile error with eventmachine only.  Now then, once downloaded  let’s run (from the windows command line):

    => gem install thin

    Great, it installs just fine!  Let’s try running it: (using the command rails s thin)


    And, let’s open a web browser and see what happens:

    .. yay, it’s working. 

    So, the one thing that people may complain about with Ruby and Ruby on Rails is that setting things up is no easy task on Windows.  This is primarily why most people that develop with Rails tend to use Linux or Mac, and even Mac can run into its own complexities.   With Windows however, you have to remain calm and be patient throughout the installation process.  Before we continue, let’s recap what we have accomplished so far:

    • Installed and configured Windows 2008 Server EE (64 bit) with Active Directory as its primary role (although AD is not currently configured)
    • Installed Apache 2.x (as our load balancer) (still needs configuration)
    • Installed Ruby 1.9.2(p180)
    • Installed the Ruby Development Kit
    • Installed Ruby on Rails v. 3.0.5
    • Configured Sqlite3 as our database
    • Installed THIN as our fast HTTP Web Server
    • .. and tested that it works for the most part.

    That's a pretty big list already!  So, before we move on, let’s take a break and rest and come back tomorrow and continue with our setup.  See you in part four..

    Installing Windows Server 2008 EE with Ruby on Rails and LDAP (Part Two)


    Installing Windows Server 2008 EE with Ruby on Rails and LDAP (Part Two)

    So, looking back at part one, I was happy to get most of the server software installed and initially configured.  However, I know there’s still quite a few things to do here.  I haven’t even started to install Ruby or RoR yet, and it's always a lot of fun having to grab a hundred or so critical microsoft patches! 

    The next thing that I need to do is perform a few updates, namely running windows updateto get the server up to par.  Once done, I’ve decided to disable Internet Explorer protection, which is the largest nag feature ever invented for Windows Server Environments.  Normally, in a production server environment, there’s absolutely no reason to have browsing enabled.  But, since this is a 100% test environment, I want to enable it.  The easiest way to do this is through the administrator tools à server manager. 


    If you click on the root of the Security Manager and scroll down to Security Information, you can click Configure IE ESC.  I’m going to turn this feature off for both admins and users.  It will make testing easier.  But, again, on a normal production server you would not have any browsing on anyways so this would not be turned off.

    Once our updates are completed and the server has been restarted, we can start thinking about how we want to go about the rest of the project.

    Deciding on Web Servers

    After much research, my goal is going to be to use Apache as a Web Server load balancer and couple it with a fast HTTP server that can run Ruby.  I can go with either Mongrel or Thin in this respect, but I’ve decided that Thin will work best for this first project.  Mongrel or Thin can work completely on their own without Apache, but they wouldn’t be able to handle load balancing and it would only allow for a very light load.  This is why I’m using both together.  The only thing to note is that Apache does not come with 64-bit support for windows.  Oh well, we can’t have everything perfect now can we?  To simplify things, here is a list of items I will be downloading before I continue:

    Downloads:

    Apache:

    Ruby 1.9.2:

    Developer Kit-Ruby:

    Once everything has been downloaded, I’m ready to start the installation of Apache. Everything appears pretty simple here.  I chose all of the defaults, changing the administrator email to a local one, and selected the default locations.  Once the installation is completed, I see the apache icon in the system tray and it shows the service has been started.  So far, so good.  Let’s go ahead and install Ruby.

    I’m going to keep the default ruby location for C:\Ruby192, but I will set the ruby executables in the path and associate the .rb and .rbw extensions.  I will then click install and let it finish the installation.


    Now that the basic installations are installed, let’s test out Ruby and see if it works.

    We can do ruby –v to find out our ruby version.  We can also do a gem –v to find our gem version.  Finally, we can run IRB and type in 2 + 2 to see 4.


    The paths were already set so we can do this from any command prompt in any path.  So far so good!  If I run a gem update system there’s nothing to update.  Okay, we’re in good shape here.  At this point I’m going to save my snapshot and make sure everything is saved.  We actually covered a lot in this part two, so we'll work on some new things in part three.